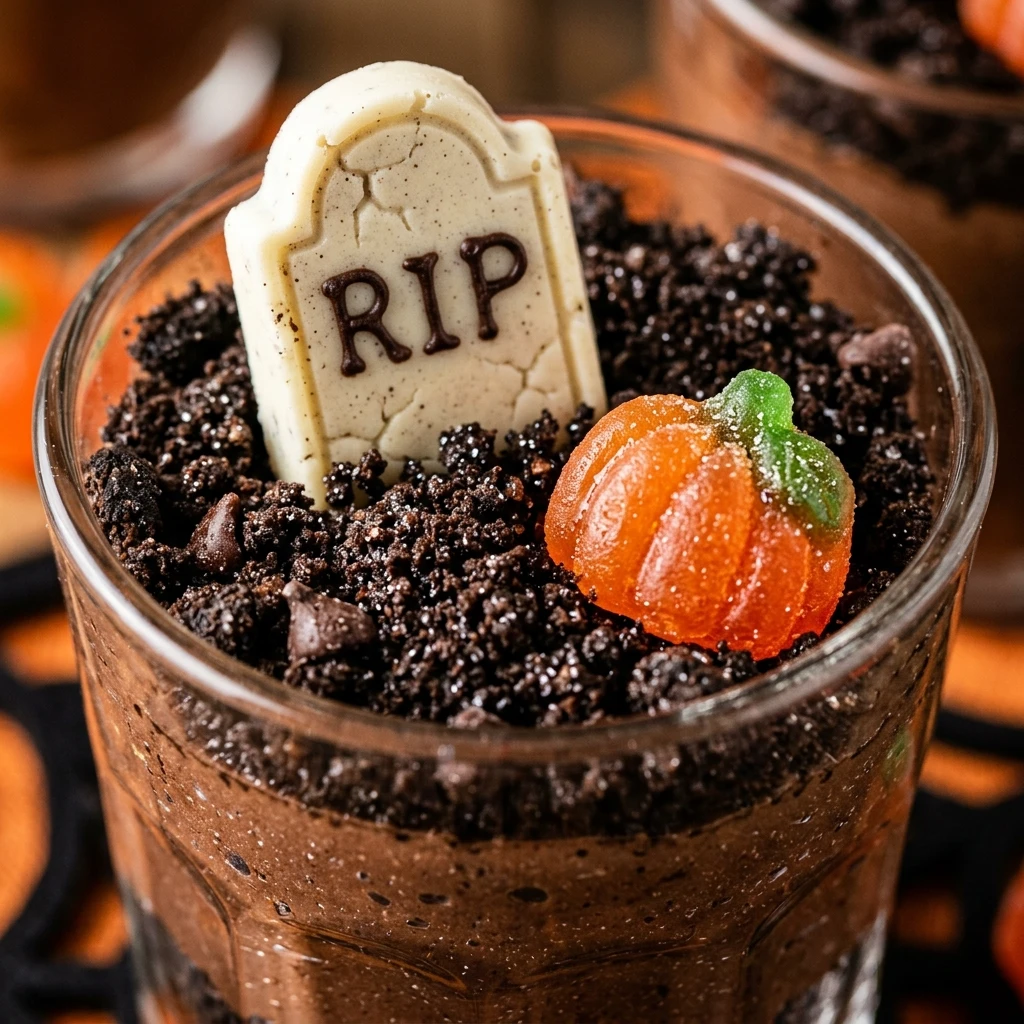

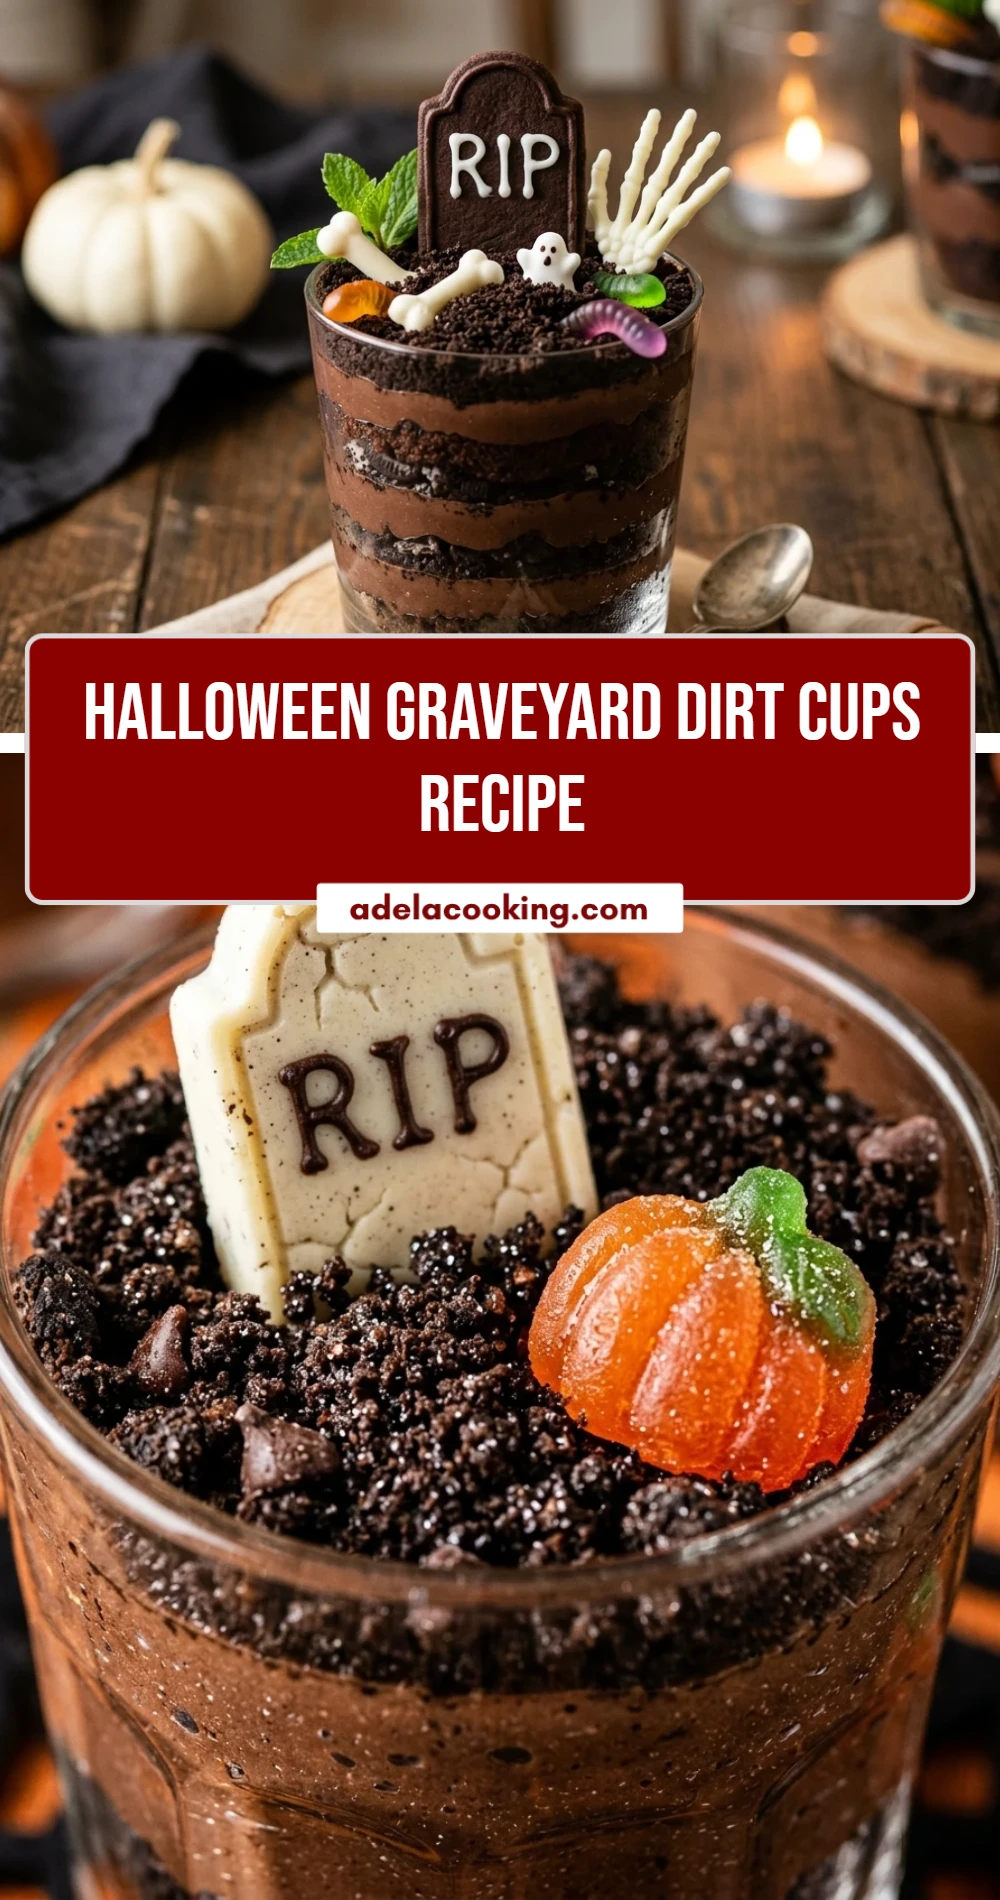
Halloween is the season for spooky treats and creepy-crawly snacks. If you are looking for a dessert that is as fun to look at as it is to eat, this Halloween Graveyard Dirt Cups Recipe is the perfect choice. It combines creamy chocolate pudding with crunchy “dirt” and festive decorations that kids and adults will absolutely love.
The beauty of this recipe lies in its simplicity. It is a no-bake dessert that comes together in minutes, making it ideal for busy parents or last-minute party planning. Whether you are hosting a haunted house gathering or just want a festive afternoon snack, these little graveyards are sure to be the star of the show.
Recipe Information
- Prep Time: 20 minutes
- Cook Time: 0 minutes
- Total Time: 20 minutes
- Servings: 6 servings
- Difficulty Level: Easy
Nutrition Information
- Calories per serving: 345 kcal
- Protein: 4g
- Carbohydrates: 58g
- Fat: 12g
- Fiber: 1g
- Sugar: 42g
- Sodium: 480mg
Why Make This Halloween Graveyard Dirt Cups Recipe
This recipe is a classic for a reason. It uses familiar flavors like chocolate and cream, but presents them in a way that sparks the imagination. It is an interactive dessert that allows kids to get involved in the “construction” of their own spooky graveyard. Plus, there is no oven required, which keeps your kitchen cool while you prepare for other festivities.
Beyond being fun, these cups are also very portable. By serving them in individual clear plastic cups, you create a mess-free experience for parties. Guests can grab a cup and a spoon and enjoy their treat while mingling, and you do not have to worry about slicing or serving a large cake.
How to Make Halloween Graveyard Dirt Cups Recipe
Creating these spooky treats is a simple process of layering and decorating. Follow these easy steps to build your very own edible cemetery.
Ingredients
- 1 package (3.9 ounces) instant chocolate pudding mix
- 2 cups cold whole milk
- 1 container (8 ounces) whipped topping, thawed
- 1 package (14.3 ounces) chocolate sandwich cookies (like Oreos)
- 6-12 Milano cookies (to serve as tombstones)
- 1 tube black decorating icing or an edible ink marker
- 1 pack gummy worms
- Candy pumpkins or spooky sprinkles for garnish
Directions
Step 1: Prepare the Cookie Dirt
Place the chocolate sandwich cookies in a large plastic resealable bag. Use a rolling pin or a heavy spoon to crush them until they look like fine potting soil. You can leave a few larger chunks for “rocks” if you like. Set these aside in a bowl.
Step 2: Mix the Pudding
In a large mixing bowl, whisk together the instant chocolate pudding mix and the cold milk. Continue whisking for about two minutes until the mixture begins to thicken. Let it sit for five minutes to firm up completely.
Step 3: Fold in the Whipped Topping
Gently fold the thawed whipped topping into the chocolate pudding. Use a spatula to stir slowly until the color is uniform and the mixture is light and fluffy. This creates a “mousse-like” texture for your graveyard base.
Step 4: Layer the Cups
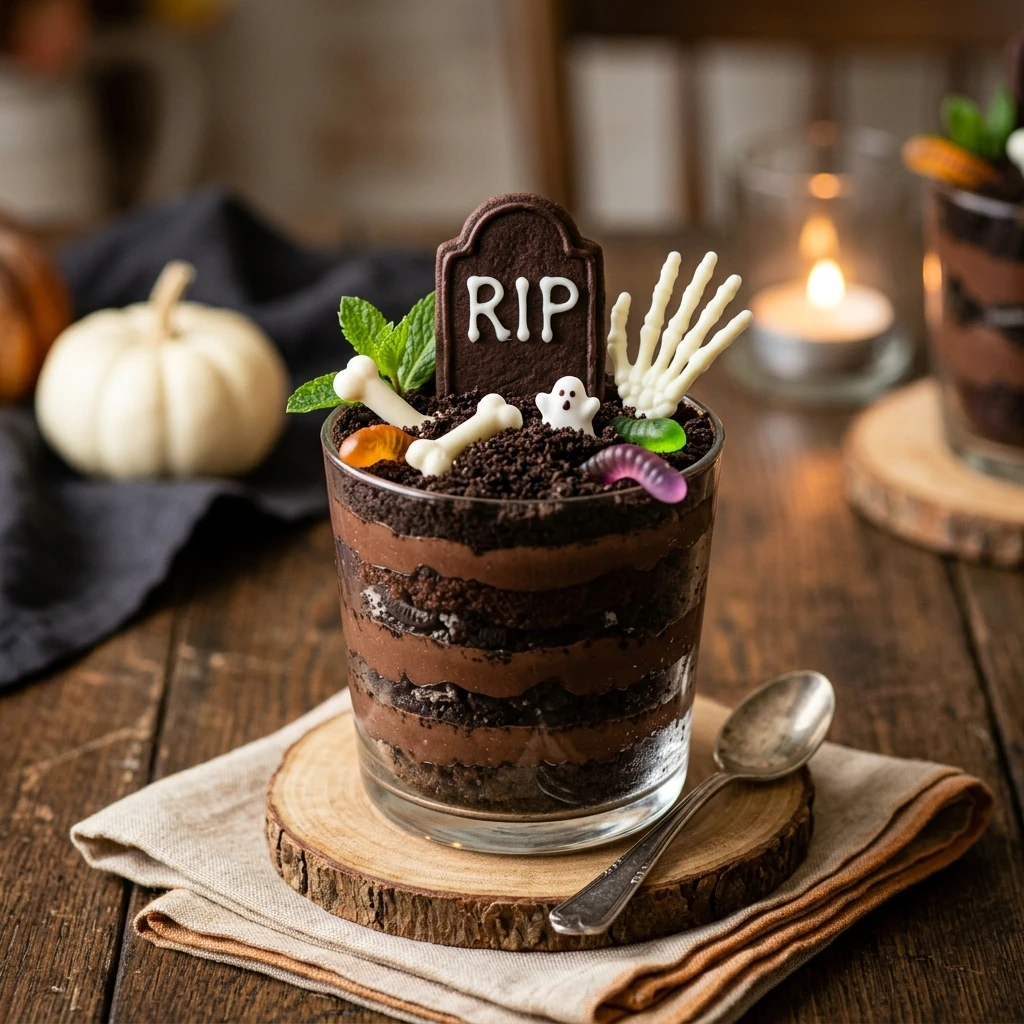
Take six clear plastic cups. Place a spoonful of the crushed cookie “dirt” at the bottom of each cup. Follow with a layer of the pudding mixture. Repeat the layers until the cups are nearly full, ending with a generous layer of cookie crumbs on top.
Step 5: Decorate the Tombstones
Take your Milano cookies and use the black decorating icing to write “R.I.P.” or draw small crosses on the top half of each cookie. Let the icing set for a minute so it does not smear during assembly.
Step 6: Assemble the Graveyard
Press one decorated Milano cookie into the back of each cup so it stands upright like a tombstone. Tuck a gummy worm into the “dirt” so it looks like it is crawling out, and add a candy pumpkin to complete the spooky scene.
How to Serve Halloween Graveyard Dirt Cups Recipe
Serve these cups immediately for the best texture. If you are serving them at a party, place them on a dark platter or a faux-grass mat to enhance the graveyard theme. Provide small plastic spoons for each guest. For an extra touch, you can dim the lights and use glowing Halloween decorations around the serving tray.
How to Store Halloween Graveyard Dirt Cups Recipe
If you have leftovers, cover the cups with plastic wrap and store them in the refrigerator. They will stay fresh for up to 3 days. Note that the cookie “dirt” on top may soften slightly over time due to the moisture from the pudding, and the Milano cookies might lose their crunch, so it is best to add the tombstone cookies just before serving if possible.
Expert Tips for Perfect Halloween Graveyard Dirt Cups Recipe
To get the most realistic “dirt” look, use a food processor to pulse the cookies into a fine powder. For a deeper, darker soil, use “Double Stuf” or dark chocolate sandwich cookies. If you find the pudding is too soft, make sure your milk was ice-cold before mixing. Also, chilling the assembled cups (minus the tombstones) for an hour before the party helps the layers set beautifully.
Delicious Variations
- Vanilla Graveyard: Use vanilla pudding dyed with green food coloring to look like toxic sludge or mossy ground.
- Healthy Swap: Use Greek yogurt mixed with cocoa powder instead of pudding for a high-protein version.
- Bones and Skulls: Add white chocolate covered pretzels or skull-shaped candies to the top for more “remains” in the dirt.
- Peppermint Earth: Mix a drop of peppermint extract into the pudding for a refreshing “grass” flavor.
Frequently Asked Questions
Q: Can I make these dirt cups ahead of time?
Yes, you can prepare the pudding and cookie layers up to 24 hours in advance. However, wait to add the Milano cookie tombstones and gummy worms until you are ready to serve so they stay upright and crunchy.
Q: What can I use if I cannot find Milano cookies?
Any oval-shaped cookie will work. Nutter Butters or even rectangular graham crackers can be decorated to look like tombstones.
Q: Is there a dairy-free version of this recipe?
Yes! Use a dairy-free instant pudding mix, almond or oat milk (use less liquid as it may not set as firmly), and a vegan whipped topping alternative.
Q: How do I stop the tombstones from falling over?
Make sure the pudding layer is thick enough to hold the cookie. If they still tip, push them deep into the cup until they touch the bottom or lean them slightly against the side of the glass.
Q: Can I freeze these dirt cups?
Freezing is not recommended as the texture of the pudding and the crunch of the cookies will change significantly once thawed.
Conclusion
This Halloween Graveyard Dirt Cups Recipe is a delightful way to bring some spooky spirit to your dessert table. It is easy, affordable, and endlessly customizable. Whether you are making them with your kids or serving them at a large party, these treats are guaranteed to be a “deadly” success. Happy Halloween!

Halloween Graveyard Dirt Cups Recipe
- Total Time: 20 minutes
Ingredients
- 1 package (3.9 ounces) instant chocolate pudding mix
- 2 cups cold whole milk
- 1 container (8 ounces) whipped topping, thawed
- 1 package (14.3 ounces) chocolate sandwich cookies (like Oreos)
- 6–12 Milano cookies (to serve as tombstones)
- 1 tube black decorating icing or an edible ink marker
- 1 pack gummy worms
- Candy pumpkins or spooky sprinkles for garnish
Instructions
- Step 1: Prepare the Cookie Dirt: Place the chocolate sandwich cookies in a large plastic resealable bag. Use a rolling pin or a heavy spoon to crush them until they look like fine potting soil. You can leave a few larger chunks for “rocks” if you like. Set these aside in a bowl.
- Step 2: Mix the Pudding: In a large mixing bowl, whisk together the instant chocolate pudding mix and the cold milk. Continue whisking for about two minutes until the mixture begins to thicken. Let it sit for five minutes to firm up completely.
- Step 3: Fold in the Whipped Topping: Gently fold the thawed whipped topping into the chocolate pudding. Use a spatula to stir slowly until the color is uniform and the mixture is light and fluffy. This creates a “mousse-like” texture for your graveyard base.
- Step 4: Layer the Cups: Take six clear plastic cups. Place a spoonful of the crushed cookie “dirt” at the bottom of each cup. Follow with a layer of the pudding mixture. Repeat the layers until the cups are nearly full, ending with a generous layer of cookie crumbs on top.
- Step 5: Decorate the Tombstones: Take your Milano cookies and use the black decorating icing to write “R.I.P.” or draw small crosses on the top half of each cookie. Let the icing set for a minute so it does not smear during assembly.
- Step 6: Assemble the Graveyard: Press one decorated Milano cookie into the back of each cup so it stands upright like a tombstone. Tuck a gummy worm into the “dirt” so it looks like it is crawling out, and add a candy pumpkin to complete the spooky scene.
- Cook Time: 20 minutes
- Diet: Vegetarian